If your business generates invoices, packing slips, proposals, or any kind of document from structured data, you can fully automate that process using Airtable and PDFMonkey, with no external automation tool required. This guide walks through the complete integration so you can go from manual copy-paste to one-click PDF generation directly inside Airtable.
What You’ll Build
By the end of this tutorial you’ll have a system that:
- Triggers PDF generation with a button click in your Airtable interface
- Populates a professionally designed template with live data from your base (including line items)
- Stores the generated PDF attachment directly on the Airtable record
- Uses PDFMonkey’s synchronous API, so no polling or waiting required
Video Walkthrough
Prerequisites
- An Airtable account: a paid plan is required for the “Run script” automation action
- A PDFMonkey account: a free tier is available
- Basic comfort with HTML and JavaScript (most of the code can be copied directly from this guide)
- Your PDFMonkey API key
Tools Required
| Tool | Purpose |
|---|---|
| Airtable | Your data source and automation host |
| PDFMonkey | PDF template engine and generation API |
No Make, Zapier, or n8n needed. Everything runs inside Airtable’s automation platform.
Step 1: Set Up Your Airtable Base
Your Airtable base needs two tables with the following structure.
Invoices Table
| Field | Type |
|---|---|
| Invoice Number | Formula: {ID} + 1000 |
| Customer Name | Single line text |
| Customer Address | Single line text |
| Invoice Date | Date |
| Due Date | Date |
| Status | Single select |
| Total Amount | Rollup (sum of Line Items) |
| Notes | Long text |
| Invoice PDF | Attachment |
| Line Items | Link to “Line Items” table |
| ID | Auto number |
Line Items Table
| Field | Type |
|---|---|
| ID | Auto number |
| Invoice | Link to “Invoices” table |
| Item Description | Single line text |
| Quantity | Number |
| Unit Price | Currency |
| Total Line Amount | Formula: {Quantity} * {Unit Price} |
Note: Field names are case-sensitive and must match exactly when you configure the automation script. If you use different names, update them in the script accordingly.
Step 2: Create Your PDFMonkey Template
Sign up at pdfmonkey.io and create a new Document Template. You’ll use HTML and CSS to design the invoice layout, and PDFMonkey’s Liquid-style syntax for dynamic fields.
After creating your template, you’ll need two pieces of information:
- Your API Key, available at
https://dashboard.pdfmonkey.io/api-key - Your Template ID, found in the template URL (the UUID at the end) or via the “Copy ID” button in the editor

Invoice HTML Template
Here is a complete, production-ready invoice template you can paste into PDFMonkey’s HTML editor:
<head>
    <title>Invoice</title>
    <style>
        * { margin: 0; padding: 0; box-sizing: border-box; }
        body {
            font-family: 'Helvetica', 'Arial', sans-serif;
            font-size: 12px;
            line-height: 1.6;
            color: #333;
            padding: 40px;
        }
        .invoice-container { max-width: 800px; margin: 0 auto; }
        .header {
            display: flex;
            justify-content: space-between;
            align-items: flex-start;
            margin-bottom: 40px;
            padding-bottom: 20px;
            border-bottom: 3px solid #2c3e50;
        }
        .company-name { font-size: 28px; font-weight: bold; color: #2c3e50; margin-bottom: 5px; }
        .company-details { font-size: 11px; color: #666; line-height: 1.4; }
        .invoice-title { text-align: right; }
        .invoice-title h1 { font-size: 36px; color: #2c3e50; margin-bottom: 10px; }
        .invoice-number { font-size: 14px; color: #666; }
        .invoice-details {
            display: flex;
            justify-content: space-between;
            margin-bottom: 40px;
        }
        .section-title {
            font-size: 11px;
            font-weight: bold;
            color: #999;
            text-transform: uppercase;
            margin-bottom: 10px;
            letter-spacing: 0.5px;
        }
        .customer-name { font-size: 16px; font-weight: bold; color: #2c3e50; margin-bottom: 5px; }
        .invoice-meta { text-align: right; }
        .meta-row { display: flex; justify-content: flex-end; margin-bottom: 8px; }
        .meta-label { font-weight: bold; margin-right: 15px; color: #666; }
        .meta-value { color: #333; min-width: 120px; text-align: right; }
        .line-items-table { width: 100%; border-collapse: collapse; margin-bottom: 30px; }
        .line-items-table thead { background-color: #2c3e50; color: white; }
        .line-items-table th {
            padding: 12px;
            text-align: left;
            font-size: 11px;
            font-weight: bold;
            text-transform: uppercase;
            letter-spacing: 0.5px;
        }
        .line-items-table th.text-right,
        .line-items-table td.text-right { text-align: right; }
        .line-items-table th.text-center,
        .line-items-table td.text-center { text-align: center; }
        .line-items-table tbody tr { border-bottom: 1px solid #e0e0e0; }
        .line-items-table tbody tr:last-child { border-bottom: 2px solid #2c3e50; }
        .line-items-table td { padding: 12px; font-size: 12px; }
        .totals-section { display: flex; justify-content: flex-end; margin-bottom: 40px; }
        .totals-table { width: 300px; }
        .total-row {
            display: flex;
            justify-content: space-between;
            padding: 10px 0;
            font-size: 14px;
        }
        .total-row.grand-total {
            border-top: 2px solid #2c3e50;
            font-weight: bold;
            font-size: 18px;
            color: #2c3e50;
            margin-top: 10px;
            padding-top: 15px;
        }
        .notes-section {
            margin-top: 40px;
            padding: 20px;
            background-color: #f9f9f9;
            border-left: 4px solid #2c3e50;
        }
        .footer {
            margin-top: 60px;
            padding-top: 20px;
            border-top: 1px solid #e0e0e0;
            text-align: center;
            font-size: 10px;
            color: #999;
        }
    </style>
</head>
<body>
    <div class="invoice-container">
        <div class="header">
            <div class="company-info">
                <div class="company-name">Your Company Name</div>
                <div class="company-details">
                    123 Main Street<br>
                    City, State 00000<br>
                    billing@yourcompany.com
                </div>
            </div>
            <div class="invoice-title">
                <h1>INVOICE</h1>
                <div class="invoice-number">#{{invoiceNumber}}</div>
            </div>
        </div>
        <div class="invoice-details">
            <div class="bill-to">
                <div class="section-title">Bill To</div>
                <div class="customer-name">{{customerName}}</div>
                <div class="customer-address">{{customerAddress}}</div>
            </div>
            <div class="invoice-meta">
                <div class="meta-row">
                    <span class="meta-label">Invoice Date:</span>
                    <span class="meta-value">{{invoiceDate}}</span>
                </div>
                <div class="meta-row">
                    <span class="meta-label">Due Date:</span>
                    <span class="meta-value">{{dueDate}}</span>
                </div>
            </div>
        </div>
        <table class="line-items-table">
            <thead>
                <tr>
                    <th>Description</th>
                    <th class="text-center">Qty</th>
                    <th class="text-right">Unit Price</th>
                    <th class="text-right">Amount</th>
                </tr>
            </thead>
            <tbody>
                {% for item in lineItems %}
                <tr>
                    <td>{{item.description}}</td>
                    <td class="text-center">{{item.quantity}}</td>
                    <td class="text-right">${{item.unitPrice}}</td>
                    <td class="text-right">${{item.totalAmount}}</td>
                </tr>
                {% endfor %}
            </tbody>
        </table>
        <div class="totals-section">
            <div class="totals-table">
                <div class="total-row grand-total">
                    <span>Total:</span>
                    <span>${{totalAmount}}</span>
                </div>
            </div>
        </div>
        {% if notes %}
        <div class="notes-section">
            <div class="notes-title">Notes</div>
            <div class="notes-content">{{notes}}</div>
        </div>
        {% endif %}
        <div class="footer">Thank you for your business!</div>
    </div>
</body>
Test Data
Before connecting to Airtable, verify your template renders correctly. In the PDFMonkey template editor, go to the Test Data tab and paste this JSON:
{
  "invoiceNumber": "INV-2025-001",
  "customerName": "Acme Corporation",
  "customerAddress": "456 Business Blvd, Suite 200\nNew York, NY 10001",
  "invoiceDate": "October 28, 2025",
  "dueDate": "November 27, 2025",
  "totalAmount": "3,450.00",
  "notes": "Payment due within 30 days. Include invoice number with payment.",
  "lineItems": [
    { "description": "Website Development", "quantity": "1", "unitPrice": "2,500.00", "totalAmount": "2,500.00" },
    { "description": "SEO Optimization", "quantity": "1", "unitPrice": "750.00", "totalAmount": "750.00" },
    { "description": "Monthly Hosting", "quantity": "2", "unitPrice": "100.00", "totalAmount": "200.00" }
  ]
}
Step 3: Create the Airtable Automation
In your Airtable base, go to Automations and create a new automation.
Automation Setup
- Trigger: “When a button is clicked”: add a Button field to your Invoices table and connect it to this automation
- Action: Click ”+ Add action” and choose “Run script”
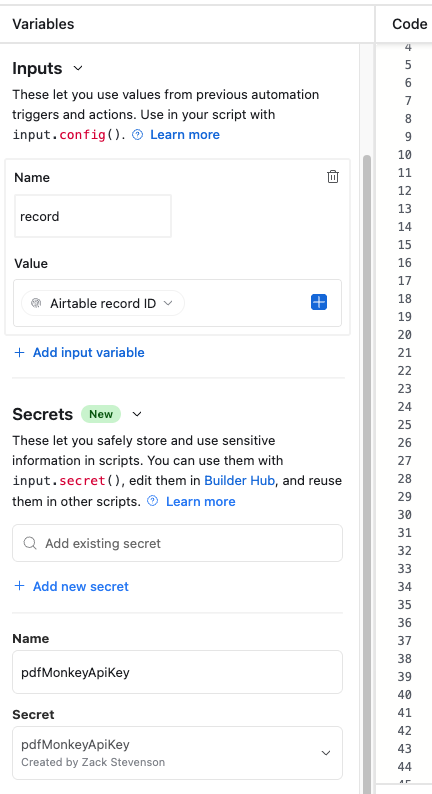
- Input variables: Click ”+ Add input variable” and add:
pdfMonkeyApiKey(Secret): your PDFMonkey API keyrecord(Record): the “record id” from the trigger
The Automation Script
Copy and paste this script into the Airtable script editor. The only required change is swapping in your Template ID on the line marked below.
// ============================================
// AIRTABLE TO PDFMONKEY: INVOICE GENERATOR
// ============================================
// Uses PDFMonkey's synchronous endpoint: no polling needed.
// Author: Zack Stevenson @ InnerDev Solutions
// Docs: https://docs.pdfmonkey.io/pdfmonkey-features/synchronous-generation

// ============================================
// CONFIGURATION: update these values
// ============================================

let apiKey = input.secret("pdfMonkeyApiKey");

// Your Template ID from the PDFMonkey template URL or "Copy ID" button
let templateId = "YOUR-TEMPLATE-ID-HERE"; // <- Update this

const INVOICES_TABLE_NAME = "Invoices";       // <- Update if different
const LINE_ITEMS_TABLE_NAME = "Line Items";   // <- Update if different

let invoicesTable = base.getTable(INVOICES_TABLE_NAME);
let lineItemsTable = base.getTable(LINE_ITEMS_TABLE_NAME);

// ============================================
// RETRIEVE INVOICE RECORD
// ============================================

let inputConfig = input.config();
const recordId = inputConfig.record;

console.log("Starting invoice generation for record:", recordId);

let invoiceQuery = await invoicesTable.selectRecordsAsync();
let record = invoiceQuery.getRecord(recordId);

if (!record) {
    output.set('status', 'error');
    throw new Error(`Record ${recordId} not found`);
}

// ============================================
// EXTRACT INVOICE DATA
// ============================================

// Update field names below if yours differ
let invoiceData = {
    invoiceNumber: record.getCellValue("Invoice Number"),
    customerName:  record.getCellValue("Customer Name"),
    customerAddress: record.getCellValue("Customer Address"),
    invoiceDate:   record.getCellValue("Invoice Date"),
    dueDate:       record.getCellValue("Due Date"),
    totalAmount:   record.getCellValue("Total Amount"),
    notes:         record.getCellValue("Notes")
};

// Format dates: "October 29, 2025"
const formatDate = (val) => val
    ? new Date(val).toLocaleDateString('en-US', { year: 'numeric', month: 'long', day: 'numeric' })
    : null;

invoiceData.invoiceDate = formatDate(invoiceData.invoiceDate);
invoiceData.dueDate     = formatDate(invoiceData.dueDate);

if (invoiceData.totalAmount) {
    invoiceData.totalAmount = invoiceData.totalAmount.toFixed(2);
}

// ============================================
// EXTRACT LINE ITEMS
// ============================================

let lineItemsRecords = record.getCellValue("Line Items");
let lineItems = [];

if (lineItemsRecords && lineItemsRecords.length > 0) {
    let lineItemsQuery = await lineItemsTable.selectRecordsAsync();

    for (let linked of lineItemsRecords) {
        let li = lineItemsQuery.getRecord(linked.id);
        if (li) {
            let qty   = li.getCellValue("Quantity");
            let price = li.getCellValue("Unit Price");
            let total = li.getCellValue("Total Line Amount");
            lineItems.push({
                description: li.getCellValue("Item Description"),
                quantity:    qty.toFixed(0),
                unitPrice:   price.toFixed(2),
                totalAmount: total.toFixed(2)
            });
        }
    }
}

// ============================================
// CALL PDFMONKEY SYNCHRONOUS API
// ============================================

let payload = {
    invoiceNumber:   invoiceData.invoiceNumber,
    customerName:    invoiceData.customerName,
    customerAddress: invoiceData.customerAddress,
    invoiceDate:     invoiceData.invoiceDate,
    dueDate:         invoiceData.dueDate,
    totalAmount:     invoiceData.totalAmount,
    notes:           invoiceData.notes,
    lineItems:       lineItems
};

let meta = {
    _filename: `Invoice-${invoiceData.invoiceNumber}.pdf`,
    airtableRecordId: record.id,
    generatedAt: new Date().toISOString()
};

try {
    let response = await fetch('https://api.pdfmonkey.io/api/v1/documents/sync', {
        method: 'POST',
        headers: {
            'Authorization': `Bearer ${apiKey}`,
            'Content-Type': 'application/json'
        },
        body: JSON.stringify({
            document: {
                document_template_id: templateId,
                status: "pending",
                payload: payload,
                meta: meta
            }
        })
    });

    let data = await response.json();

    if (response.ok) {
        let doc = data.document_card;

        if (doc.status === 'success') {
            console.log("PDF generated:", doc.download_url);
            output.set('status', 'success');
            output.set('downloadUrl', doc.download_url);
            output.set('filename', doc.filename);
        } else {
            console.error("Generation failed:", doc.failure_cause);
            output.set('status', 'failure');
            output.set('error', doc.failure_cause);
        }
    } else {
        console.error("API error:", response.status, JSON.stringify(data));
        output.set('status', 'error');
        output.set('error', data);
    }

} catch (error) {
    console.error("Script error:", error.message);
    output.set('status', 'error');
    output.set('error', error.message);
}
Pro tip: The script uses PDFMonkey’s synchronous endpoint (
/api/v1/documents/sync). It waits for generation to complete before responding, so you get the download URL immediately, no polling loop needed.
Step 4: Save the PDF Back to the Record
After the “Run script” action succeeds, add an “Update record” action:
- Click ”+ Add advanced logic or action” and choose “Update record”
- Set Table to “Invoices”
- Set Record ID to the record ID from Step 1 (the trigger)
- Map the Invoice PDF field to
downloadUrlfrom the script output
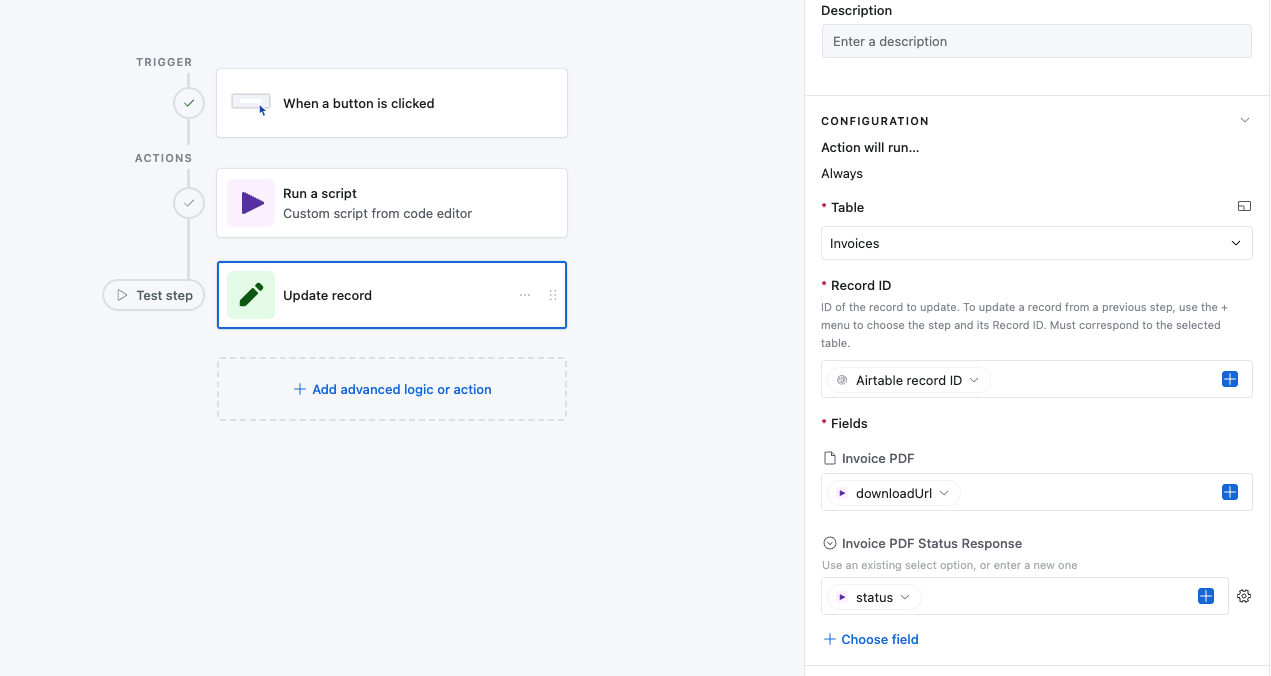
This saves the generated PDF as an attachment on the record so it’s accessible directly from Airtable.
Troubleshooting Common Issues
PDF generates with blank fields
Check that your payload key names match the variable names in your PDFMonkey template exactly. These are case-sensitive (invoiceNumber vs invoice_number are different).
Automation fails with an API error
Verify your pdfMonkeyApiKey secret is correct and your Template ID matches what’s in the PDFMonkey dashboard URL.
Line items show as raw text
Ensure your template uses {% for item in lineItems %} iteration and that lineItems is a JSON array, not a stringified value.
Automation triggers but “Invoice PDF” field stays empty
Make sure the “Update record” action is mapped to the downloadUrl output variable from the script, not status or another variable.
Dates show as null in the PDF
Airtable returns date values in ISO format. The formatDate helper in the script handles this conversion. If you’re pulling dates differently, check the raw value with console.log first.
What to Build Next
Once this base automation is running, common extensions include:
- Multi-template routing: use different PDFMonkey templates based on document type (invoice vs. quote vs. packing slip) by adding a conditional before the API call
- Email delivery: add a “Send email” action after the update step to deliver the PDF link to the client automatically
- Automatic invoice numbering: use Airtable Automations to increment a counter field and populate the Invoice Number before triggering this script
- Client portal: store the
public_share_linkoutput on the record and surface it in a client-facing Airtable interface
Need help setting this up for your specific workflow? Get in touch. We build these integrations regularly and can typically have a working system in place within a few days.